
The QVD demo allows you to try out the software with nothing more than a copy of one of the various clients we provide. As well as experiencing the use of a Virtual Desktop through the client, the latest demo enables you to administer a separate instance of the QVD demo and experience the Web Administration tool. So you can get a feel for creating disk images of your own, and and adding users and virtual machines. This way you get to experience QVD administration with very little in the way of setup overhead.
To try the demo, you’ll need to head over to the registration page and sign up for an account which should take no more than a minute or two. We will send your account details to the email address, so check that in due course. Once you have your user name and password, start up the QVD client of your choosing. We will use the Linux client for this tutorial, but the Windows client experience is almost identical. Enter the host demo.theqvd.com, the email address you used, and the password that we have sent you.
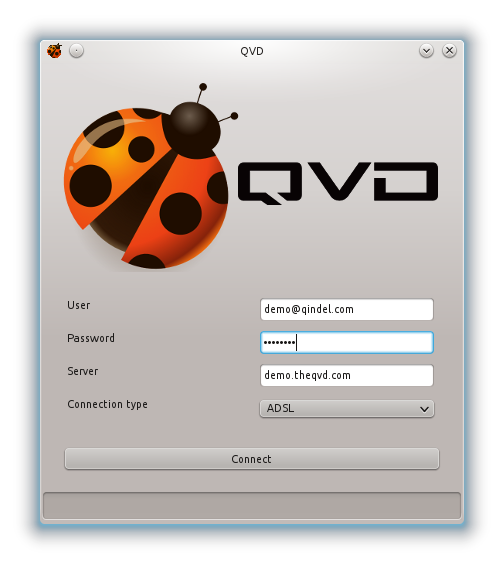
Click Connect and welcome to your new VDI desktop environment! You should now have is a fully functional Linux desktop running LXDE. This is an example of the type of desktop that you could provide to your users using our software, with your own customisation and branding (indeed, desktop environment) of course.
If we go one step further, on the desktop you will find two icons, WAT and QVD Client. WAT provides you a link to the QVD Web Administration tool that we have set up for your evaluation of the administration of the QVD software. To do so, double click the WAT icon which will open up the Chromium browser and direct it straight to the login screen of our Web Administration demo.
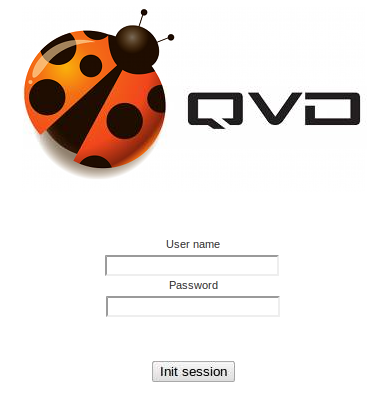
Log in using admin as both the user name and password which will place you at the WAT welcome page. This will give you an overview of the QVD installation, telling you how many nodes you are running (one for the purposes of this demo), how many virtual machines you have running, along with other useful figures such as the number of users you have, how many sessions are running, and so on. Note that as others may have been using the demonstration, it may already contain other users, images and virtual machines that they have created. The nested demonstration is automatically reset every morning around 6AM CET so changes are not persistent.
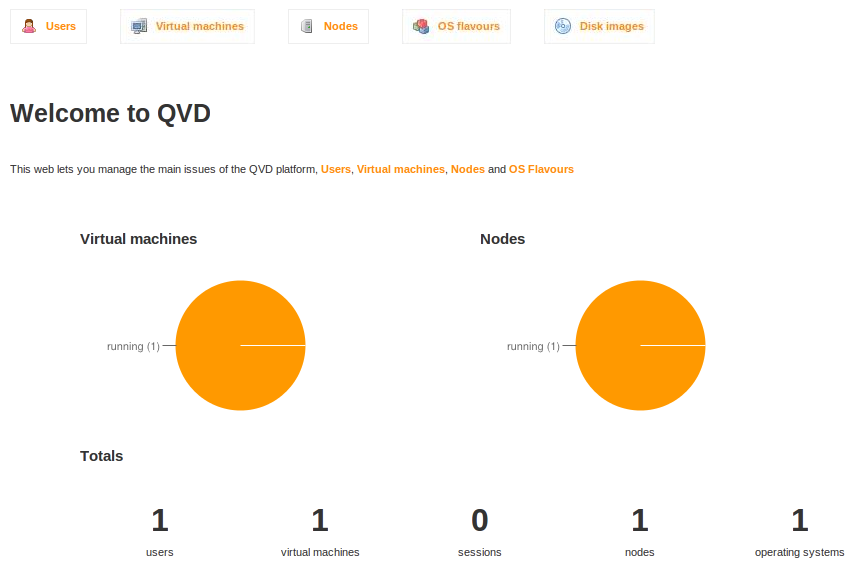
The demo QVD server will have one server by default, as well as an OSF and Disk Image. You will find one node in the Nodes tab. There’s no point in adding any to this instance as they won’t work, but this is where you would scale up your install by adding additional nodes to serve desktops in a real world situation. However, the point of this nested demonstration is to go further than that and show you how to add your own user, disk image, user and virtual machine, so let’s dive right in.
Go to the OSF tab, and click the New link. Give your OSF a name (let’s say demo), and allocate RAM and disk space. Moving on to the Disk Images tab, create a new disk image by selecting the appropriate link and choosing your new OSF and the provided image file which will create a new disk image. Select the Create button and give it a few seconds.
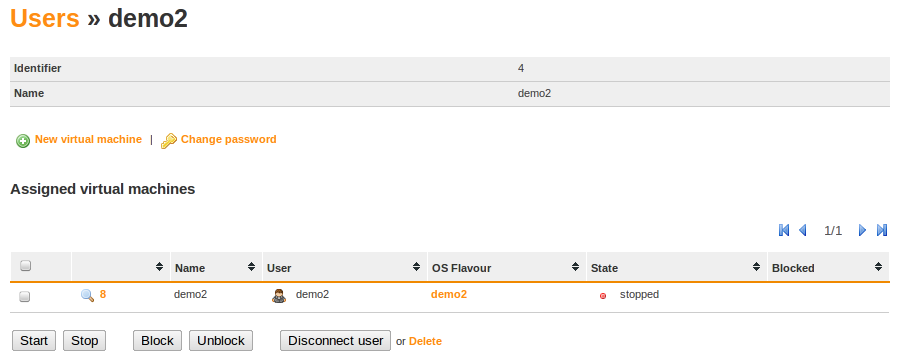
Once that is done, take a look at the Users tab. Here you can add a new user using the provided link, and choose a password for the user in the next screen. Now you are ready to create a virtual machine for your user, so select the magnifying glass next to your desired user’s ID and, alongside any other virtual machines that user may have, select New Virtual Machine. Choose a name, and the disk image you have created and QVD will create the virtual machine.
Start up the QVD client on the desktop. It will be pointing towards the correct QVD server, so concern yourself only with the username and password. Enter the credentials for any user that you have created and provisioned with a VM. Click Connect and within a few seconds you will be inside the new VM that you have created.
Feel free to explore the demo Web Administration Tool and create disk images, users, and virtual machines. You will find that in a configured QVD environment that this is very simple, and note how each user can have multiple VMs for different use cases.
If you’d like to explore further, you can take a look at the QVD Appliance in the downloads section, or install the software for yourself and browse the administration manual. If you have any questions or need help, don’t hesitate to get in touch.