
QVD 3.2 has been released, featuring support for the BTRFS file system. This is something we have been working on in earnest since the release of 3.1, and it’s something we are pretty excited about as it brings considerable performance gains to larger QVD deployments.
ADVANTAGES OF BTRFS
With BTRFS support, we further underpin the infrastructure savings of a VDI deployment by spreading the IOPS across the shared storage and the local storage of each node reducing load on the shared storage by up to 75%.
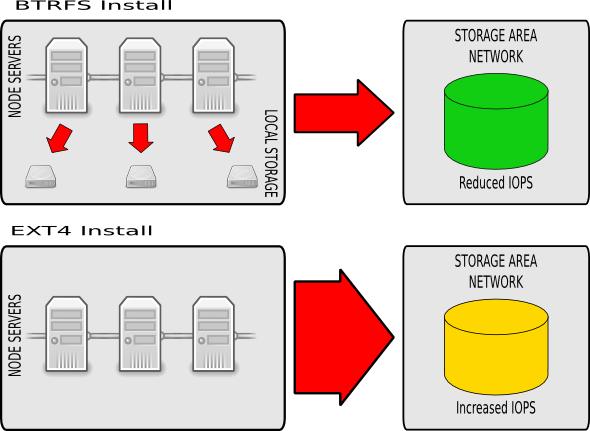
By moving the overlay (usually non persistent data such as logs and temporary files) to local storage, the system reduces the load on the shared storage by some magnitude. This means potential savings on NFS hardware which will be able to cope better and with greater demands than previously.
As well as reducing the load on the shared storage, QVD performance is enhanced by reducing network overhead. Using fuse-unionfs or aufs in order to provide a private Read-Write copy of the base image to the LXC containers over the network can become a performance bottleneck and BTRFS provides a simple and cost effective solution by keeping some of that data local.
Additionally, VM creation now leverages the powerful Copy-on-Write (CoW) technology of BTRFS to create snapshots of existing VMs in near real time delivering a further performance boost.
WHAT IS BTRFS?
BTRFS is a relative newcomer to the world of Linux file systems that offers excellent performance through its specialised Copy-on-Write snapshotting features. For QVD this means a major gain in the speed of deployment of each new VM alongside the ability to significantly offset disk operations across the nodes in a QVD install.
BTRFS also provides other convenient features, such as the ability to resize a live filesystem, as well as excellent built-in storage pool capabilities, allowing you to quickly and easily administer and add space to your nodes should this be necessary.
QVD 3.2 BTRFS support was written with a goal of having the system use some of the performance enhancing features of the file system without you having to get your hands dirty managing the sub volumes of the file system. To all intents and purposes, it should function just like any other QVD install, albeit with greatly enhanced performance if deployed as intended. That’s not to say you shouldn’t do some reading up on BTRFS before you attempt to use the feature.
HOW IT WORKS
Let’s start with a whistle-stop tour of the QVD storage directories in a typical LXC install. Each QVD Disk Image that is uploaded is extracted out of the staging directory into the images directory, which may well be shared remotely via NFS between multiple nodes and should be considered read-only to ensure the integrity of the images. From here the node extracts this shared image (really, just a Linux root file system) the first time it is used by a new VM to create the base file system from which the VM is run. This extraction is into basefs, which is also treated as a read-only filesystem by QVD.
For components of the system such as log data, runtime PIDs, lock files and temporary files that by their very nature can not to be read-only, we need to create an overlay, typically stored in overlayfs. Each virtual machine has its own overlay directory inside overlayfs, and this is named by combining the name of the Disk Image and the id of the VM.
The homefs directory stores all the user’s home data (assuming this is persistent) and should be stored remotely and accessed over NFS for anything other than the smallest deployments of QVD.
With all the directories present and correct, the QVD House Keeping Daemon (HKD) will perform a union mount, using either the fuse-unionfs or the aufs module, of the image in the basefs folder with the automatically generated overlay file system and home file system. This mount is performed inside the rootfs folder in the shared storage. The HKD will then load the newly mounted image into an LXC container.
With BTRFS configured, this differs in subtle ways. Every image is unpacked into its own subvolume in basefs which will be reused by each VM that uses this disk. When a container is started, the overlayfs is also created inside its own btrfs subvolume. For each subsequent VM using this disk image, QVD creates a snaphot of this subvolume and the snapshot is used as the container root file system. Given BTRFS’ remarkable ability to create Copy-on-Write (CoW) snapshots and subvolumes cheaply with little overhead this is almost instant.
The BTRFS snapshots can be seen as directories using the normal coreutils tools such as ls. They can also be listed using the btrfs-tools command btrfs, as follows:
# btrfs sub list /var/lib/qvd/storage/
ID 256 top level 5 path basefs/2-2-openSUSE-12.2-desktop.i386.tar.gz
ID 258 top level 5 path overlayfs/2-3-overlayfs
ID 259 top level 5 path overlayfs/2-5-overlayfs
Here we can see the basefs subvolume, along with two additional subvolumes for two VMs that have been created and run using the same basefs.
LIMITATIONS
Because BTRFS is a local file system unlike NFS, the overlay and rootfs data is visible only to the local node. This means this data cannot be perisistent across the nodes, so if a VM changes nodes, changes to this data are lost. (Note that making overlay data is optional in QVD, so this may not matter at all). So, too, the overlay and rootfs data will be lost a new default disk image is created for the same Operating System Flavor.
A concern you may have about BTRFS is that it is still marked as experimental. This is not viewed as a particular concern as we have deployed it in QVD in a manner that only transient, non-important data, should ever be stored on BTRFS. Your home data, and your images, should still be stored on NFS using a more mature file system. QVD has been designed to recover gracefully from any BTRFS hiccups, indeed, simply recreating a BTRFS file system on your designated storage should be sufficient should be sufficient.
Finally, please note that only SUSE Linux Enterprise Server 11 SP2 is officially supported at this time. SUSE have historically been a strong supporter of BTRFS and their OS has specific BTRFS patches that are unavailable in the stock Ubuntu 12.04 kernel. Happily, those patches have made it into later kernels, so getting QVD 3.2 BTRFS to work under Ubuntu 12.04 is simply a matter of upgrading the kernel to at least 3.5 (or use a later version of Ubuntu such as 12.10). We cannot provide official support for Ubuntu at this time, however feel free to contact us with any questions if you do run into trouble.
HOW TO SET IT UP
To take advantage of the new BTRFS features in QVD 3.2 you’ll need either a fresh install or you will need to upgrade an existing (LXC only) installation using the 3.2 repositories. For a guide to installing an LXC instance, please refer to the QVD Administration Manual. The 3.2 repo for SLES 11 SP2 is available here:
http://download.opensuse.org/repositories/home:/qvd:/qvd-3.2.0/SLE_11_SP2/
The Ubuntu PPA is here:
https://launchpad.net/~qvd-qindel/+archive/qvd-3.2.0
Both overlayfs and rootfs need to be stored on a BTRFS volume. One way to achieve this would be to mount the entire QVD storage folder (by default /var/lib/qvd/storage) on a BTRFS volume. If you are upgrading a previous install, you could of course convert your file system from Ext3/4, exercising due caution and ensuring you have backups of everything before you commence. The images and homefs directories should not be on the relatively unstable BTRFS and so may be mounted on top of this directory, either to local disk or using an NFS attached network disk. The setup in this instance is trivial:
# qa config set path.storage.btrfs.root = ${path.storage.root}
# qa config set path.storage.overlayfs = ${path.storage.btrfs.root}/overlayfs
# qa config set path.storage.rootfs = ${path.storage.btrfs.root}/rootfs
Alternatively, offload the overlayfs and rootfs onto a local BTRFS volume within the node and amend the above settings to point QVD to the locations for these folders.
Next, you will need to configure QVD to use BTRFS, which can be done with the following command:
# qa config set vm.lxc.unionfs.type=btrfs
If this is an upgrade of a previous install, you will need to restart the QVD House Keeping Daemon:
# service qvd-hkd restart
From here you are ready to add new VMs to your QVD install. Please note that previous VMs on an upgrade install will not be able to run without manual intervention, both to the filesystems and to the QVD database, so we wouldn’t advise upgrading unless you are happy to lose these or prepared to spend some time recovering them manually.